 virtualhome.blog My blog about virtualized infrastructures, backup and disaster recovery topics and the cloud !
Related Articles

I recently had the chance to deploy a small Cluster consisting of Lenovo System x Servers with the SD Media Adapter built in.
Here is a little Overview of the Lenovo SD Media Adapter:
https://lenovopress.com/lp0020-sd-media-adapter-video
The SD Media Adapter intends to be a boot partition for hypervisors with which you can configure a RAID Level and a LUN. There are also options for preloaded SD Cards with ESXi images.
In this article i’d like to show, how i configured a RAID1 consisting of two SD Cards for installing VMware ESXi on it.
Prerequisites
- IP address of the Integrated Management Module (IMM) has to be set and must be reachable
- The SD Media Adapter and both SD Cards must be installed
- Putty for connecting to the Integrated Management Module (IMM) via SSH
If the server is running, the SD Media Adapter with both SD cards have been installed and the IP address is reachable, you may connect to the IMM via Putty with SSH.
After you logged in with your credentials, you can check if both SD Cards can be seen by the host with the following command.
Initializing the SD cards
sdraid -driveList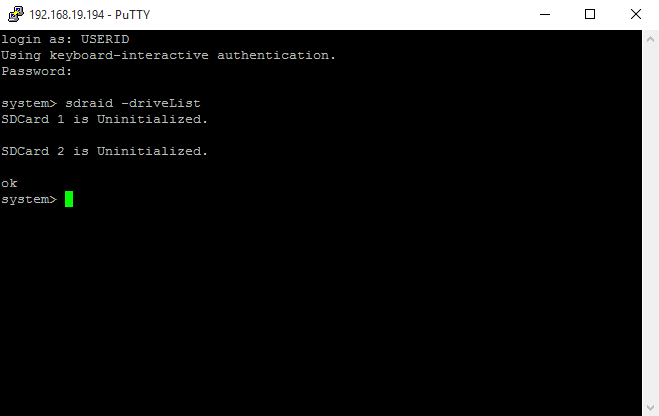
Now you are able to see, that both cards have been correctly recognized by the host.
We also need to check, which mode the SD Media Adapter Controller has by issuing the following command
sdraid -getMode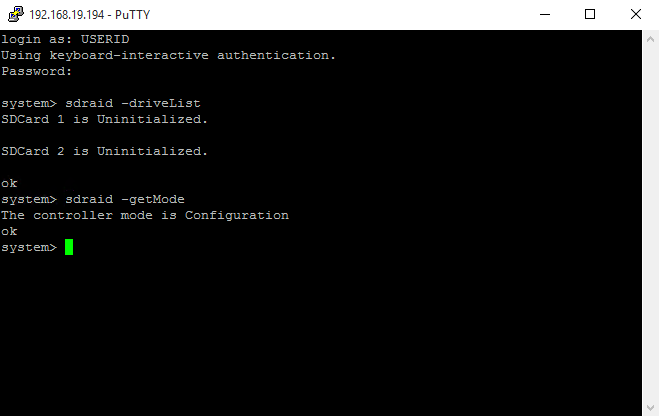
The SD Media Adapter Controller can either be in “configuration” mode or in “operational” mode. The host won’t see any drives or partitions if the SD Media Adapter is in the “configuration” mode.
Since we are already in the correct mode for configuring the SD cards, we can now initialze them with the following command.
sdraid -initializeConfig -now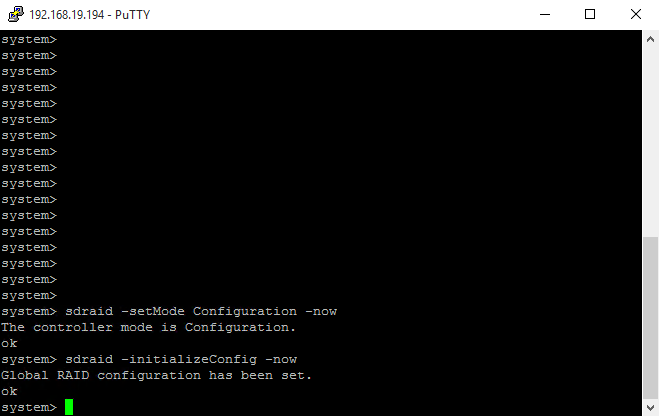
Creating the configuration
If your controller is not in the configuration mode, you can manually set it with the following command.
sdraid -setMode Configuration -nowAfter issuing the “initializeConfig” command, you may want to re-check your “drive list”, with the “sdraid -driveList” command again.
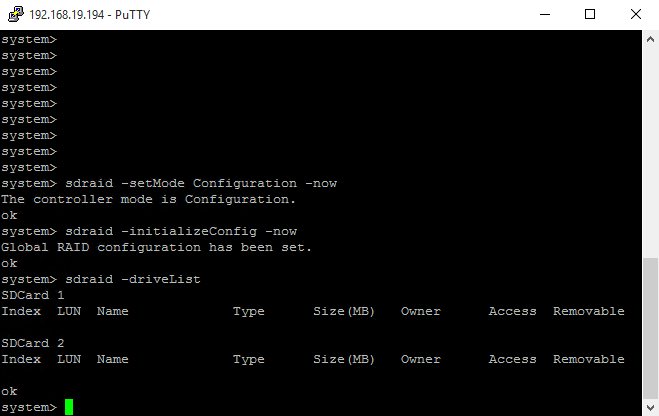
You can now see, that both SD Cards have been initialized and are ready to format. Now we need one last command to create the RAID set and the partition.
sdraid -create -driveName ESX_SDCARD -sizeMB 29000 -target mirror -removable 1 -owner system -systemReadOnly 0 -LUN 0
With this command, we are creating a RAID 1 consisting of two SD Cards. The name of the LUN will be ESX_SDCARD and will have the LUN ID 0.
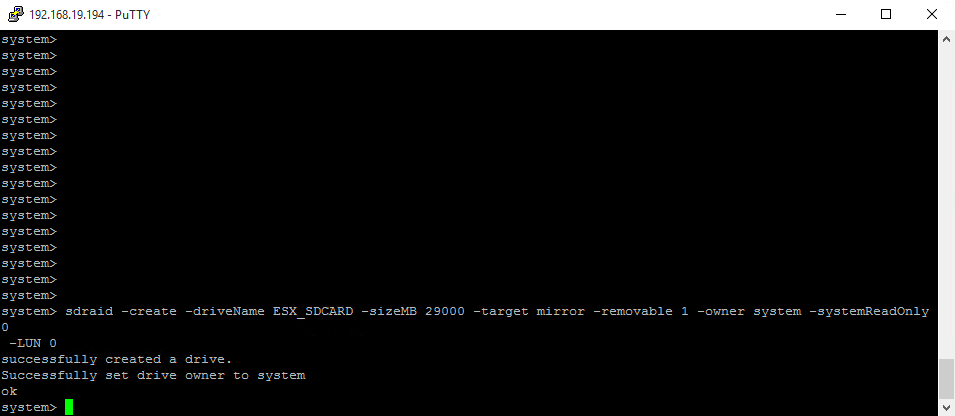
After issuing this command, you have successfully configured a RAID1 Array among two SD Cards.
The last step is to set the controller into the “operational” mode, so ESXi will recognize the LUN.
Therefore issue the following command
sdraid -setMode Operational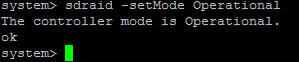
After you have set the controller to the operational mode, you can re-check it within the Integrated Management Module GUI and will see the following:

If you are now booting the ESXi image to install it, you will see the newly created LUN, where you are able to install ESXi on it.

I hope this helps whilst configuring a Lenovo System X server for ESXi virtualization with a SD Media Adapter !