 virtualhome.blog My blog about virtualized infrastructures, backup and disaster recovery topics and the cloud !
Related Articles


Introduction
I’m finally doing Note-Taking with VS Code, GitHub, and Markdown!
In my search for the best way to take notes, I’ve tried different tools like OneNote, EverNote, and Notion. They all seemed promising at first, but I found they had some problems that made them hard to use (for me) !
OneNote was too cluttered and to deep integrated into the Microsoft ecosystem to store things across devices. EverNote was slow and didn’t work well across all my devices, and I didn’t like the UI to be honest. Notion was the most promising one, but I never really settled with it to build my “knowledge base”.
Another issue with these tools was that they didn’t work well with other apps I use. They were like closed boxes, and I couldn’t make them fit into my workflow easily.
I was using VS Code already as my “default” text editor, so I’m pretty familiar with it and I really like the design and simplicity of the whole application. So, I decided to try something different. I started Note-Taking with VS Code along with Markdown, a way to format text easily, and GitHub, a place to store and share my notes. I’ve been using GitHub in the past already to share scripts and stuff with the community. Feel free to follow me on the GitHub platform: Falko Banaszak on GitHub.
The new “Note-Taking with VS Code” setup
With this new setup, I found I had more control over how I organized my notes. It was like having a blank canvas where I could create anything I wanted. Plus, because VS Code and GitHub are widely used by developers, there are lots of helpful resources and extensions available to make things even easier.
I even enhanced it with some shell scripts to automate tasks like creating Markdown files for Note-Taking with VS Code and to automate git management.
So how does the stack look like exactly ?
- Microsoft Visual Studio Code — get it here: https://code.visualstudio.com/
- Git (I’m on a Mac, but it works everywhere) — get it here: https://git-scm.com/
- A terminal / shell of your choice (I’m using zsh on my Mac)
- A private GitHub Repository — check out GitHub here: https://github.com/
- Markdown Files / Language — more info here: https://www.markdownguide.org/
- Some important Visual Studio Code Extension which I cover later on in this blog post
- Free monitor space, because you are going to live in Visual Studio Code 🙂
How to get yourself ramped up with Markdown ?
You have probably heard about Markdown already. But I recommend diving into it by reading the Getting Started Markdown guide on markdownguide.org. You can access it here: https://www.markdownguide.org/getting-started/
There is even a cheat-sheet available which helps you a lot and which you can revisit over and over again. Check out the following webpage to get the cheat-sheet: https://www.markdownguide.org/cheat-sheet/
I also have this cheat-sheet handy in my Visual Studio Code Setup in case I need to look at it again 😉

This screenshot also helps understand my folder hierarchy and how I sort out my things here.
- The folder “PRIVATE” reflects my “big” git repository, hosted on GitHub, where I store my things.
- Under the folder “NOTES”, I store all my notes which use from day to day.
- I cannot show you the other folders as it would reveal stuff, but this is basically my private “data and folder hierarchy” where I store my files and all my notes. Based on Markdown of course!
As you can see in the screenshot, on the right-hand side there is a Preview window, which “translates” all the Markdown files into a “human-readable” format. Yes, it looks just a like normal document, but still the “Markdown” code itself is very easy readable as well. That is one big advantage here!
The live preview is already built into Visual Studio Code and helps you with reading your Markdown documents in a “non-code” format.
I can only recommend reading through this whole page on Visual Studio Code and Markdown, as it is pretty awesome: https://code.visualstudio.com/docs/languages/markdown
How do you get started with Git ?
As soon as you start using GitHub or as soon as you want a “version control”, you will most probably encounter Git or SVN. Git is a mighty tool and really has a lot of features to offer. I personally think I’m not using even 5% of its capabilities.
Depending on how you learn new things, there are several tutorials, videos and courses out there to help you in getting started with Git.
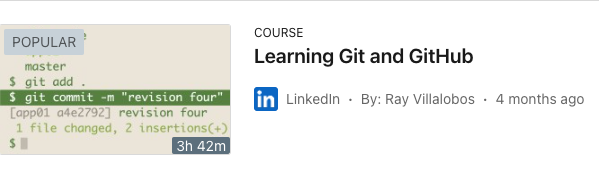
Personally, I’ve watched many videos and did a course on LinkedIn Learning. One of the best videos where you will get a complete understanding of Git in an hour is this one: https://youtu.be/8JJ101D3knE
The best LinkedIn Learning course I encountered, was this one: Learning Git and GitHub
The moment you are familiar with Git, initialize your repository and start using your desired folder hierarchy to create Markdown files.
How does my Note-Taking with VS Code workflow look like ?
- Every note I create underneath my folder hierarchy is a markdown.md file
- If it is a complex note, I regularly do git add, git commit and git push to GitHub to make sure I get the potential out of the versioning provided by Git
- I created a little bash script to create notes when I start my day
- I created another little bash script which helps me combine git add, git commit & git push whereby I only need to provide a commit message
- With the right extensions, you can preview almost every kind of file type, like images, Microsoft files and of course all kind of “coding” file types
- This approach makes it easy to maintain a “second brain” or complete “knowledge base” kind of Git repository
Before I jump into a “workflow cycle” I want to show you the two very simply bash scripts I use to create my markdown files and to combine git add, git commit and git push.
Create Markdown Files script
This script simply creates a Markdown file in the current folder with the current date as the filename.
In addition, it pastes the first heading directly into the file, so I can start right away.
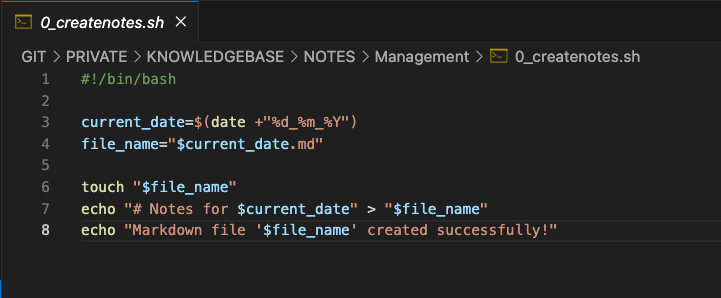
This is completely adjustable to your needs. If you need other templates or if you want to let that Markdown file look differently, go to your favourite search engine and search for those templates. There are plenty of examples out there and a lot of ideas to start on.
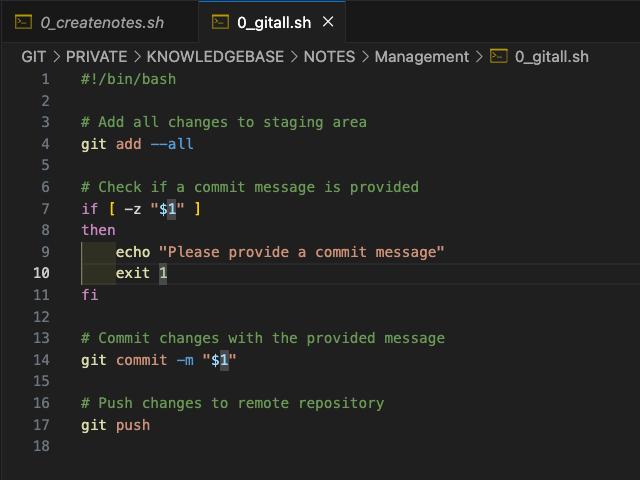
Combining git add, git commit and git push
The next simple script combines basically three commands while still having the ability to write a message when using git commit.
Normally the process would look like this:
git add filename or git add .
git commit -m “a message to describe your commit”
git push
Due to the fact, that I’m committing at least every 30 minutes and directly want to push this to GitHub to have it save there as well, I wanted to automate it a bit. This is why I created this little script.
You can find all resources including the scripts, the Markdown Cheat Sheet and the list of Visual Studio Code extensions on this public GitHub repository:
My Note-Taking with VS Code workflow cycle
Let’s say I created a new file within Visual Studio Code. You can of course create that file in various other ways like pasting it there, or using touch in your favourite terminal.
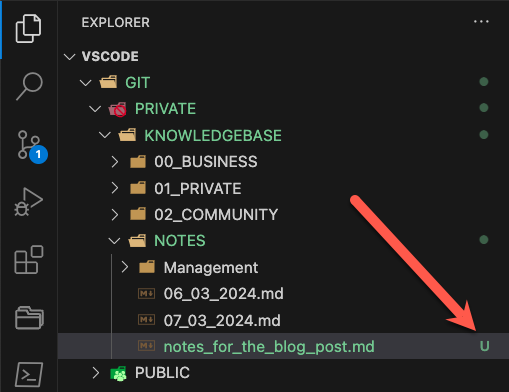
As you can see, Visual Studio Code flags this file within the Git repository with a capital “U”. The capital “U” means untracked and is not know within Git so far. You can also verify this with the command line approach by writing “git status”.
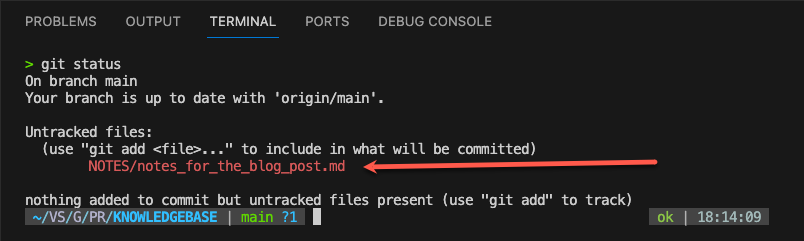
To track this file, we need to use the “git add” command. Before doing that, let’s add some very important content to this file.
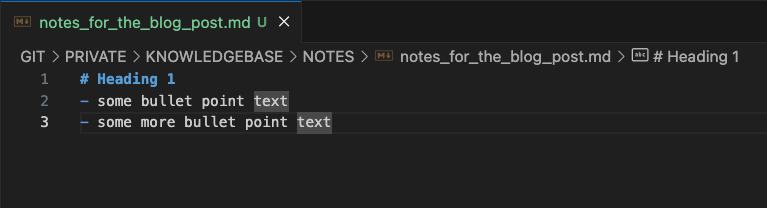
As you can already see here, VS Code highlights the Markdown structure pretty straight forward. So lets add the file so it can be tracked by Git and push it to GitHub by using the three commands already mentioned above.
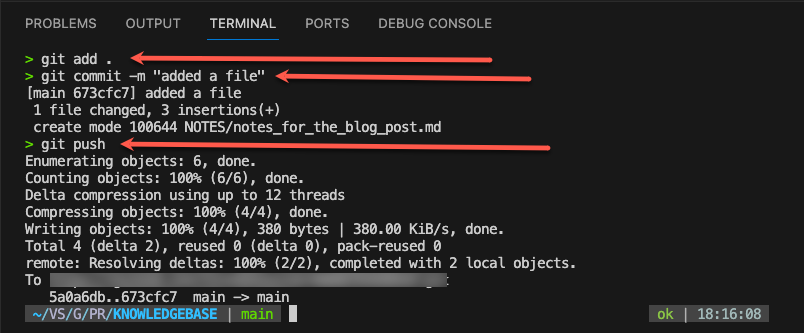
If you issued “git status” again, Git would tell you, that there are no untracked files and everything is clean. As you can see, there is a lot of typing involved to make sure the files are tracked, committed and pushed to the GitHub repository. That’s why I created that little script, so it helps me while doing the “whole cycle” in a single line.
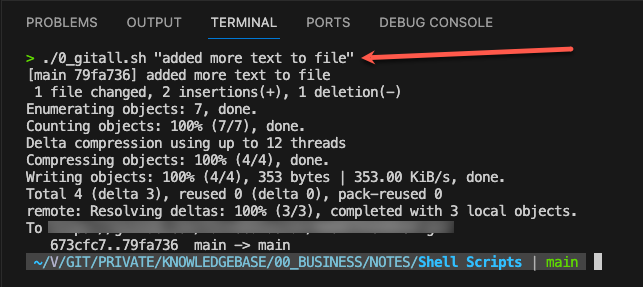
As you can see, the script itself condenses the lines to write into a single line, and it would also throw an error if you would not provide a commit message.
This is it, this is basically the entire workflow I’m using right now. I’m still in constant change and want to add a few more things to the entire workflow. This includes the following things, for example:
- Encryption of all files in the Git repository or encrypting the whole repository
- Adding a second Git remote location to push my Git repositories to 2 Git locations. This results in a consistent state on my Mac, GitHub and the third location.
Visual Studio Code Extensions I use
Last but not least, here is a list of all the Visual Studio Code Extensions I’m using and a brief explanation of why I use them.
- Docx/ODT Viewer — It allows you to open Word and Excel files !
- Git Graph — Shows your commits and basically everything you do in a nice graphical interface
- Git History — Show all your commits nicely !
- indent-rainbow — Pretty awesome tool to highlight indentation nicely
- Live Server — if you create web files for example it helps you to preview it directly
- Open — Very good extension to open a file with the default application on your system if its not supported within Visual Studio Code
- PowerShell — obvious
- vscode-icons — cool icons to brush up Visual Studio Code look and feel
- vscode-pdf — opens .pdf files in a new tab in Visual Studio Code
- Markdown All In One — The name says it all
- markdownlint — helps you in writing pretty Markdown
- Markdown Emoji — adds emojis 🙂
As always, feel free to write comments, feedback and feel free to propose more features you would like to see 🙂